
How To : Use the Healing Brush in Photoshop
How to use the healing brush in Adobe Photoshop to touch up photos and remove scars and blemishes.

How to use the healing brush in Adobe Photoshop to touch up photos and remove scars and blemishes.
Do you love to edit your photos in Photoshop? Watch this quick video that contains some really neat tips on how to use the healing brushes and patch tools in Photoshop. The spot healing brush makes it easy to brush away blemishes or other marks on the skin. It's good for small ...more
This video will take you through a detailed example using the clone stamp and healing brush tools. You will learn how to use the Photoshop’s clone source panel to remove an unwanted section of a picture and then clean up the image using the healing brush. Whether you're new to ...more
In this how to video, you will learn how to remove acne with Photoshop. First, open the image you want to edit in Photoshop. Go to the left column and select the healing brush. Next, set the brush size and find a part of the image that is clear. Hold alt and click. Next, start ...more
This video in the Software category will show you how to remove pimples and wrinkles in Photoshop. Yanik from Yanik’s photo school presents this video. Select the photo you want to work on. First you duplicate the layer by ctrl+J or select from the dropdown menu. You start off ...more
This video tutorial is about removing makeup in a photo using Photoshop. To do this, first of all, open the photo. Then zoom in on the area where you want to remove the makeup. The tool that is to be used to remove makeup is the brush tool. It can be selected from the left pan ...more
Use the Spot Healing Brush Tool in Photoshop Elements 9 to remove power lines, trees, cars, even your Aunt Marge. If it's in the picture and you want it out, this simply tutorial will show you how to do it. This easy, yet powerful photo retouching tool allows you to remove el ...more
This how to video will show you how to remove blemishes and do other touch ups in Photoshop. First, open the image you want to touch up in the program. Now, choose the polygon tool and select the background of the image. Now, go to adjustments and change the brightness and con ...more
One of the very first Photoshop skills we learned in my tenth grade photojournalism class was cropping the background out of images. I hated it. It was extremely time consuming, and the magnetic lasso tool never seemed to want to cooperate with me. Nearly a decade later, the ...more
Does your model have an unsightly blemish that you'd rather not have in your final photos? Is this blemish dark and hard to ignore, like a mole? No problem! Check out this tutorial and learn how to use Photoshop's healing brush to remove any skin imperfections including moles. ...more
Learn some Photoshop skills in this software tutorial, which focuses on removing skin imperfections, like pimples and blemishes. You won't be using Photoshop, per se, but a piece of software that comes bundles with it — Camera Raw 6. Camera Raw has improved abilities in retouc ...more
In this tutorial, we learn how to remove a scar in Photoshop. First, select the magnifying glass to zoom in on the area you are working on. Next, select the paperclip icon, the select the second brush. Now, come to the edge of the scar and drag across the around the entire sca ...more
This video shows you how to remove a tattoo from a photograph using Photoshop. First, select the tattoo using the pen tool, to get a very accurate line around the tattoo. Make sure the "Paths" button is punched in. Drag the mouse and click several times to make a path around t ...more
This video teaches you how to use Photoshop to remove people from a picture but you can essentially use this method to remove anything you want from a picture. First, click on the lasso tool and highlight a figure you want to remove. Drag the highlight adjacent to the figure a ...more
First double click on the image in layer window then name it and click on OK. Now if you use magic tool on the image and delete the background, it will also delete some of the image part. So to fix it you need to find that kind of places of the image and use brush tool to fill ...more
Did you know you can create your own brushes on Photoshop? You're probably already overwhelmed by the variety of brushes, brush diameters, and other various picture settings that Photoshop offers, but if you're a professional artist or graphic designer it's sometimes necessary ...more
Meet the Adobe Photoshop Lightroom 3 Adjustment Brush! Whether you're new to Adobe's popular photo application or a digital photography professional just looking to better acquaint yourself with Photoshop Lightroom 3, you're sure to be well served by this free video software t ...more
This Photoshop tutorial shows how to avoid getting "bleed" when using the healing brush tool for covering stray hairs on the face near the hairline.
Are your digital photos missing something? Could it be fairy dust? In this tutorial, you'll learn how to create a custom brush to paint randomized sparkles to create a fantasy effect. Want to separate a foreground object from its background? Whether you're new to Adobe's popul ...more
Take full of Photoshop CS5's retooled brush palette. Whether you're new to Adobe's Creative Suite or a seasoned graphic design professional after a general overview of Photoshop CS5's most vital new features, you're sure to be well served by this video tutorial from the folks ...more
Photoshop's History Brush is great for fixing an image, but it also lets you use previous states of the image to create new effects. In this Photoshop CS2 video tutorial you will learn to use the history brush. Make sure to hit "play tutorial" in the top left corner of the vid ...more
This video shows you how to use the history brush in Photoshop. This is one way to add effects to images.
In this Software video tutorial you will learn how to make a copyright brush using Photoshop. Open up Photoshop and open a new document by clicking ctrl+N. Create a new text layer on the right side and type in your text. Right click on the text layer > rasterize type. On the l ...more
Now this tutorial gives another meaning to being on cloud 9. In this video, you'll find out how to use Photoshop in order to make an awesome looking cloud brush for your photos. Is easier to use than cutting and pasting and looks way better too. Sit back and enjoy!
The brush engine was developed back in Photoshop 7 (before CS) and is what makes Photoshop a true painting program and revolutionized the way Photoshop works. In the longest episode of PixelPerfect yet, Bert explains and demonstrates the inner workings of the brush engine. Thi ...more
This image editing software tutorial shows you how to use the healing brush tools in Photoshop CS3. Think of them as first aid for your photos! Watch and learn how to use The Clone Stamp, Spot Healing Brush, Healing Brush, and Patch Tool to retouch photos in Photoshop CS3.
The modest brush tool is one of the deepest, most versatile tools in Photoshop. It's not only a terrific painting tool, but it is also invaluable for masking, as this video demonstrates. Whether you're new to Adobe's popular raster graphics editing software or a seasoned profe ...more
In this software tutorial, Matt uses an artistic brush to make a pattern in Illustrator and then takes that pattern into Photoshop to use as a weathered layer effect. If you have a lot of custom Illustrator brushes you want to use in Photoshop, don't recreate them in Photoshop ...more
Create a custom brush which you can use to stamp your own signature onto projects you've worked with in Adobe Photoshop. You'll be able to change the size or color of your signature, and put it anywhere on the image you want.
You can learn how to change hair color with Photoshop. You can turn a brunette into a redhead. You use the brush tool over the area you want to colorize.
Add air bubbles to an image with a custom-made bubble brush. Whether you're new to Adobe's popular image editing software or simply looking to pick up a few new tips and tricks, you're sure to benefit from this free video tutorial from the folks at IT Stuff TV. For more inform ...more
In this tutorial, from graphic designer Ali Edwards, you will learn how to use cool, hand drawn lettering on your photos in Photoshop. You can buy packages of hand drawn letters and words from various sources (or make your own) and this clip will show you exactly how to add th ...more
This is a very popular brush right now and I figured that their may be some people out there who would actually like to see how they are made. So in this tutorial I show you how to create the starburst effect by itself then take it a step further and show you how to make it in ...more
In this tutorial, you'll learn how to take advantage of the 3D Brush Preview feature in Adobe Photoshop CS5. Whether you're new to Adobe's popular raster graphics editing software or a seasoned professional just looking to better acquaint yourself with the program and its vari ...more
Not knowing how to resize brushes in Adobe Photoshop is a serious handicap. Resolve the problem with this helpful video guide. Whether you're new to Adobe's Creative Suite or a seasoned graphic design professional after a general overview of Photoshop CS5's most vital new feat ...more
This video tutorial demonstrates Photoshop CS5's bristle brushes, which simulate traditional paint brushes—the kind your local art-supply store sells—and its new Mixer brush, which lets you give a photo a painterly look. Along the way, its host passes along a tip for customizi ...more
Learn how to use the new Mixer Brush tool in Adobe Photoshop CS5. Whether you're new to Adobe's popular image editing software or a seasoned graphic design professional just looking to better acquaint yourself with the unique features of Photoshop CS5, you're sure to find some ...more
Learn how to use the history brush to correct your images. You will also briefly learn how to read and interpret your image using Photoshop’s built-in histogram tool. Whether you're new to Adobe's popular image editing application or simply looking to brush up on Photoshop CS4 ...more
In this tutorial, you'll learn to adjust color behavior when using the mixer brush tool in Adobe Photoshop CS5. Whether you're new to Adobe's popular raster graphics editing software or a seasoned professional just looking to better acquaint yourself with the program and its v ...more
In this tutorial, you'll learn how to choose the best brush shape for your application in Adobe Photoshop CS5. Whether you're new to Adobe's popular raster graphics editing software or a seasoned professional just looking to better acquaint yourself with the program and its va ...more
See a number of useful key commands that will allow you to quickly resize and adjust the relative hardness of your brushes in Adobe Photoshop CS4. Whether you're new to Adobe's popular graphic editing program or a seasoned design professional looking to better acquaint yoursel ...more
If you find yourself needing to quickly remove the background from an image in Photoshop, take a moment to play with the background eraser tool. The background eraser samples the color in the center of the brush. It deletes that color and softens the edges so that color halos ...more
If you missed our tips on taking top-notch photos New Year's Eve, you may want to tune in for Lifehacker's tutorial on making your smartphone pictures look like they were taken with a quality camera. Below, learn how to: Create a more shallow depth of field to make the subjec ...more
The first thing to do is open up Photoshop. Find a pic of a person and clip art you would like to use. Open those documents. On the side of the toolbar, find the brush tool to adjust the clip art correctly. Make a rectangle inside the clip art. Then hit Ctrl+c to cut the clip ...more
Everyone's been in the following situation. You're sitting there at a nice bar, chatting up a smoking hot member of the opposite sex when all of a sudden they drop this bomb: "Can you engrave on wood in Photoshop?" The next thing you know, the night spirals into blackness and ...more
Need help getting started on this week's WTFoto Challenge? Look no further! In this tutorial, I will teach you how to create simple chalk symbols and writing in Photoshop. So read through this post and try it out yourself—or I'll tell your cousin what you said when you were dr ...more
Whether you're new to Adobe's Creative Suite or a seasoned graphic design professional after a general overview of Adobe Photoshop CS5's most vital new features, you're sure to be well served by this from the folks at Lynda, which presents a detailed, step-by-step overview of ...more
Color cast? What is it? It refers to an unwanted tint of a particular color in your photograph, which effects the whole picture evenly. It can be a ghastly sight, destroying an otherwise beautiful photo, but there is a cure. It's a common problem in digital photography, but a ...more
Photoshopuniverse shows how to remove JPEG Artifacts in photoshop. It's simple. Sometimes it happens that, you get the best picture which is related with your work, but unfortunately its low quality or small. If you zoom in a small picture it will pixilated. You will see some ...more
Importing custom brushes and patterns into Photoshop is not too complicated, you can probably handle that already. But what if you want to create your own? This video will teach you how to create your own custom brushes and patterns within Photoshop, which you can then use you ...more
Photoshop remains one of the coolest digital editing tools of all time, and if you're a user, you're likely discovering new tricks every day. One of the most helpful tricks is removing a shadow from an object, such as a face, a car, a cat, a dog or like this tutorial, a child. ...more
In this tutorial Photoshopuniverse describes how to create dotted lines in Adobe Photoshop using the brush palette. First create a new blank document in Adobe Photoshop. To open brushes palette, go to menu Window - Brushes. By adjusting spacing and hardness of brush under Brus ...more
Learn how to make a "Resident Evil"-style Biohazard Virus with nothing except the brush tool and layer effects in Photoshop. Use adjustment layers to create extra grain and contrast to your made from scratch hi-res microscopic bacteria and learn more about those brush tool opt ...more
Create crazy looking images by 'unzipping' a person or object using Adobe Illustrator to create the zipper and then adding it to an image in Adobe Photoshop. Your tools in Illustrator will be the basic shape tool, the brush pallet, and a transform filter. In Photoshop you'll n ...more
Pixel Perfect is the "perfect" show to help you with your Photoshop skills. Be amazed and learn as master digital artist Bert Monroy takes a stylus and a digital pad and treats it as Monet and Picasso do with oil and canvas. Learn the tips and tricks you need to whip those dig ...more
Whether you're new to Adobe After Effects or a seasoned digital film professional after a general overview of CS5's most vital new features, you're sure to be well served by this official video tutorial from the folks at Adobe TV. In it, you'll learn how to isolate moving fore ...more
In this tutorial, Richard Harrington uses the patch tool and healing brush tools to teach patching, healing and the vanishing point in Adobe Photoshop. Creative Cow is a support community for digital video, video editing, and media production professionals in broadcasting, mo ...more
Learn to create fern leaves by using custom brushes and adjusting brush settings along paths. Whether you're new to computer graphics, new to Adobe Photoshop CS4 or a seasoned design professional just looking to pick up a few new tips and tricks, you're certain to like this fr ...more
Using the blend modes in the brush tool, you will learn how to make an image that looks like you're looking through a microscope. We're not sure what you can do with this, but it's still pretty cool. Create a microscopic view effect using Photoshop. Click through to watch this ...more
This video explains how we can have a smooth skin in the pictures using Photoshop tools. The healing brush tool is used to delete all blemishes, red spots or black marks from the skin in the photo. While doing this it is important to select smaller portions and then go ahead i ...more
 How To:
Apple's Upcoming Repair Mode for iOS Makes Prepping Your iPhone to Be Fixed Easier and More Secure
How To:
Apple's Upcoming Repair Mode for iOS Makes Prepping Your iPhone to Be Fixed Easier and More Secure
 How To:
Make Your iPhone Do All Your Talking for You on Calls and in Person
How To:
Make Your iPhone Do All Your Talking for You on Calls and in Person
 How To:
Add Website Shortcuts to Your iPhone's Home Screen for Fast Access to Web Apps and Bookmarks
How To:
Add Website Shortcuts to Your iPhone's Home Screen for Fast Access to Web Apps and Bookmarks
 News:
Apple Pencil 3 Is Almost Here — And It Comes with Squeeze Gestures and These Other Features
News:
Apple Pencil 3 Is Almost Here — And It Comes with Squeeze Gestures and These Other Features
 How To:
The Messaging Trick You Never Knew You Needed
How To:
The Messaging Trick You Never Knew You Needed
 How To:
Customize and Use Control Center on Your iPhone for Quick Access to Your Most-Used Apps, Features, and Settings
How To:
Customize and Use Control Center on Your iPhone for Quick Access to Your Most-Used Apps, Features, and Settings
 How To:
11 Features Coming to Apple News on Your iPhone with iOS 17.5 — Including Some Big Ones!
How To:
11 Features Coming to Apple News on Your iPhone with iOS 17.5 — Including Some Big Ones!
 How To:
Apple's Integrating Game Center Leaderboards into News+ Puzzles with iOS 17.5
How To:
Apple's Integrating Game Center Leaderboards into News+ Puzzles with iOS 17.5
 How To:
Apple Has a Killer New Word Game Puzzle Called Quartiles Hiding on iOS 17.5
How To:
Apple Has a Killer New Word Game Puzzle Called Quartiles Hiding on iOS 17.5
 How To:
Identify Any Song Playing on Instagram, TikTok, and Other Apps on Your iPhone Using Shazam
How To:
Identify Any Song Playing on Instagram, TikTok, and Other Apps on Your iPhone Using Shazam
 How To:
Apple News Gives You More Options for Automatic Downloads on iOS 17.5
How To:
Apple News Gives You More Options for Automatic Downloads on iOS 17.5
 How To:
29 New Features and Changes Coming to Your iPhone with iOS 17.5
How To:
29 New Features and Changes Coming to Your iPhone with iOS 17.5
 How To:
Download and Install iOS 17.5 Beta on Your iPhone — And Try New Features Before Everyone Else
How To:
Download and Install iOS 17.5 Beta on Your iPhone — And Try New Features Before Everyone Else
 How To:
Download and Install iPadOS 17.5 Beta on Your iPhone to Explore New Features Before Everyone Else
How To:
Download and Install iPadOS 17.5 Beta on Your iPhone to Explore New Features Before Everyone Else
 How To:
Update Your iPhone's Lock Screen with an Attention-Grabbing Note, Reminder, Warning, or Other Custom Message
How To:
Update Your iPhone's Lock Screen with an Attention-Grabbing Note, Reminder, Warning, or Other Custom Message
 How To:
Your iCloud Email Lets You Create Aliases to Protect Your Primary Email Address and Organize Your Inbox
How To:
Your iCloud Email Lets You Create Aliases to Protect Your Primary Email Address and Organize Your Inbox
 How To:
Use Your iPhone's Built-in Image Analyzer to Reveal the Hidden Meaning Behind Symbols, Signs, and More
How To:
Use Your iPhone's Built-in Image Analyzer to Reveal the Hidden Meaning Behind Symbols, Signs, and More
 Text Replacements:
The Secret Weapon to Typing More with Less on Your iPhone, iPad, or Mac
Text Replacements:
The Secret Weapon to Typing More with Less on Your iPhone, iPad, or Mac
 How To:
Focus Profiles Will Change How You Use Your iPhone — Here's How to Set Them Up for Distraction-Free Experiences
How To:
Focus Profiles Will Change How You Use Your iPhone — Here's How to Set Them Up for Distraction-Free Experiences
 How To:
Force Restart an iPhone 15, 15 Plus, 15 Pro, or 15 Pro Max When It's Frozen, Glitchy, or Won't Turn On
How To:
Force Restart an iPhone 15, 15 Plus, 15 Pro, or 15 Pro Max When It's Frozen, Glitchy, or Won't Turn On
 How To:
Use FaceTime's Secret Hand Gestures and Reaction Buttons to Add Animated On-Screen Effects to Your Video Feed
How To:
Use FaceTime's Secret Hand Gestures and Reaction Buttons to Add Animated On-Screen Effects to Your Video Feed
 How To:
See Passwords for Wi-Fi Networks You've Connected Your Android Device To
How To:
See Passwords for Wi-Fi Networks You've Connected Your Android Device To
 How To:
Dox Anyone
How To:
Dox Anyone
 How To:
Create an Admin User Account Using CMD Prompt (Windows)
How To:
Create an Admin User Account Using CMD Prompt (Windows)
 How To:
The Trick That Lets You Link to Specific Start Times in YouTube Videos Right from Your Phone
How To:
The Trick That Lets You Link to Specific Start Times in YouTube Videos Right from Your Phone
 How To:
Find Vulnerable Webcams Across the Globe Using Shodan
How To:
Find Vulnerable Webcams Across the Globe Using Shodan
 How To:
Keep Your Night Vision Sharp with the iPhone's Hidden Red Screen
How To:
Keep Your Night Vision Sharp with the iPhone's Hidden Red Screen
 How To:
Make Spoofed Calls Using Any Phone Number You Want Right from Your Smartphone
How To:
Make Spoofed Calls Using Any Phone Number You Want Right from Your Smartphone
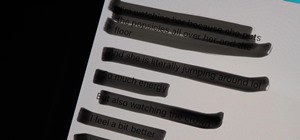 Warning:
Sensitive Info You Black Out in Images Can Be Revealed with a Few Quick Edits on Your iPhone
Warning:
Sensitive Info You Black Out in Images Can Be Revealed with a Few Quick Edits on Your iPhone
 How To:
Crack Shadow Hashes After Getting Root on a Linux System
How To:
Crack Shadow Hashes After Getting Root on a Linux System
 How To:
Dial These Secret Codes to See if Someone Is Hijacking Calls & Texts on Your iPhone
How To:
Dial These Secret Codes to See if Someone Is Hijacking Calls & Texts on Your iPhone
 How To:
Use Odin to Flash Samsung Galaxy Stock Firmware
How To:
Use Odin to Flash Samsung Galaxy Stock Firmware
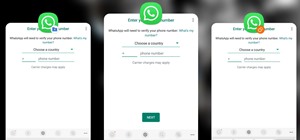
 How To:
Make Siri Say Whatever You Want Every Time You Connect Your iPhone to a Charger
How To:
Make Siri Say Whatever You Want Every Time You Connect Your iPhone to a Charger
 How To:
The Complete Guide on How to Build a Crystal Radio—Plus How They Work
How To:
The Complete Guide on How to Build a Crystal Radio—Plus How They Work
 How to Hack Wi-Fi:
Cracking WPA2-PSK Passwords Using Aircrack-Ng
How to Hack Wi-Fi:
Cracking WPA2-PSK Passwords Using Aircrack-Ng
 How To:
Beginner's Guide to OWASP Juice Shop, Your Practice Hacking Grounds for the 10 Most Common Web App Vulnerabilities
How To:
Beginner's Guide to OWASP Juice Shop, Your Practice Hacking Grounds for the 10 Most Common Web App Vulnerabilities
 Hacking Windows 10:
How to Create an Undetectable Payload, Part 1 (Bypassing Antivirus Software)
Hacking Windows 10:
How to Create an Undetectable Payload, Part 1 (Bypassing Antivirus Software)
 How To:
Read a Lowe's plant care tag
How To:
Read a Lowe's plant care tag
 How To:
Clone Any Android App on Your Samsung Galaxy Phone Without Using Any Third-Party Tools
How To:
Clone Any Android App on Your Samsung Galaxy Phone Without Using Any Third-Party Tools
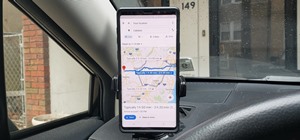 How To:
See What Traffic Will Be Like at a Specific Time with Google Maps
How To:
See What Traffic Will Be Like at a Specific Time with Google Maps
 How To:
Use Burp & FoxyProxy to Easily Switch Between Proxy Settings
How To:
Use Burp & FoxyProxy to Easily Switch Between Proxy Settings
 How To:
CC in a Physical Business Letter
How To:
CC in a Physical Business Letter
 How To:
Exploit EternalBlue on Windows Server with Metasploit
How To:
Exploit EternalBlue on Windows Server with Metasploit
 How To:
Crack Password-Protected Microsoft Office Files, Including Word Docs & Excel Spreadsheets
How To:
Crack Password-Protected Microsoft Office Files, Including Word Docs & Excel Spreadsheets
 How To:
Your iPad Has a Hidden Built-in Calculator You're Not Using — Here's How to Unlock It
How To:
Customize and Use Control Center on Your iPhone for Quick Access to Your Most-Used Apps, Features, and Settings
How To:
Your iPad Has a Hidden Built-in Calculator You're Not Using — Here's How to Unlock It
How To:
Customize and Use Control Center on Your iPhone for Quick Access to Your Most-Used Apps, Features, and Settings
 How To:
16 Harry Potter Spells for Siri That Turn Your iPhone into a Magical Elder Wand
How To:
16 Harry Potter Spells for Siri That Turn Your iPhone into a Magical Elder Wand
 How To:
Make This Amazing 9-Layer Density Tower from Things Found in Your Kitchen
How To:
Make This Amazing 9-Layer Density Tower from Things Found in Your Kitchen
 How To:
Turn Your Gag Reflex Off with Pressure Points
How To:
Turn Your Gag Reflex Off with Pressure Points
 How To:
Revive a Stale Baguette Using the Miraculous Water Trick
How To:
Revive a Stale Baguette Using the Miraculous Water Trick
 How To:
Crack a Combination Bike Lock in Under 30 Seconds
How To:
Crack a Combination Bike Lock in Under 30 Seconds
 How To:
Find Passwords in Exposed Log Files with Google Dorks
How To:
Find Passwords in Exposed Log Files with Google Dorks
 How To:
Exploit Shellshock on a Web Server Using Metasploit
How To:
Exploit Shellshock on a Web Server Using Metasploit
 How To:
If 'Messages' Consumes Too Much iPhone or iCloud Storage, Don't Delete Your Conversations Just Yet
How To:
If 'Messages' Consumes Too Much iPhone or iCloud Storage, Don't Delete Your Conversations Just Yet
 Redstone Logic Gates:
Mastering the Fundamental Building Blocks for Creating In-Game Machines
Redstone Logic Gates:
Mastering the Fundamental Building Blocks for Creating In-Game Machines
 How To:
Use SQL Injection to Run OS Commands & Get a Shell
How To:
Use SQL Injection to Run OS Commands & Get a Shell
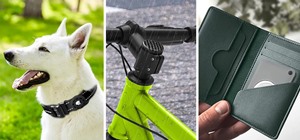 How To:
20 Surprisingly Practical Uses for Apple AirTags
How To:
20 Surprisingly Practical Uses for Apple AirTags
 How To:
Permanently Stop Any App from Updating on the Play Store — No Computer Needed
How To:
Permanently Stop Any App from Updating on the Play Store — No Computer Needed